I was super
excited to showcase one of our products in an unexpected way. I chose to use the welcome boards ( $1.70) for a project that I saw on pinterest. I have one one of my favorite quotes framed in my house that I wanted to use for the saying. I hope you love it as much as I do. I cant wait to see where its
final resting place will be in my house. A fun headboard maybe??
So here goes
my friends:
First I
decided how large I wanted it to be. 5ft x 3 ½ ft. I grabbed the boards and laid out a pattern.
Next I wanted
to try a great technique I found on a blog from one of our amazing customers
named Rita for fabulous ideas using a lot
of our products.
Okay, so what
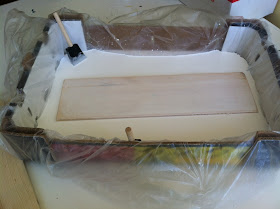
you do is mix a bit of water with 1 bottle of white paint to create a wash. I
got a little creative and used a box I found that would fit my board length. I
lined it with a plastic trash bag, poured the whitewash in it and let the
boards soak. I wanted it a bit darker so I waited until it dried and gave it a
quick coat using our foam brush and then let them dry completely.
At this point
I laid out the dried boards in my original pattern and proceeded to use wood
glue to glue them together at all seams. (note: you might want to put plastic under the boards so you don't get any
glue on the surface you are working on.)
I created a
clamp using the weight of heavy boxes to push it against the wall so it was
nice and tightly glued together .... Cuz I just didn't want to stay and hold
them all until they dried. HEE HEE.
As I
mentioned earlier I was inspired by a quote I have framed. So I had my amazing
co-worker Paige help by designing the layout for me. ( I heart you Paigey) Next
we sent it off to the printer with the sizes
(40 x 24) and viola!
I wanted it
to have a hand painted look so I grabbed some carbon paper from an office
supply store ($5.99 for a pack of 25 sheets. I used only 2) I placed it under
each letter and traced LIGHTLYno heavy
hands here ladies :).
I chose the
colors I wanted and proceeded to paint my little heart out. I was careful to
stay within the lines but also wanted it to have the charm and the
imperfections of being hand made.
Here is my
list of supplies:
1 bottle
white paint
1 bottle
crocus paint
1 bottle
charcoal paint
2 sheets
carbon paper
1 bottle wood glue
22 welcome
board
Depending on
where/how you display it you might want to use metal brackets on the back side
to make sure its stable. The great thing about this project is you can make it
any size to fit your space.
I have fallen
in love with the finished product. I adore it as a headboard... Can you say
bedroom redo?!?!?! :) But it is so versatile, it can be hung or rested against
the wall. Get creative
SO FUN, LOVE
LOVE LOVE it!

Until next
time ladies. I heart you.
HUGS!
Carrie
HUGS!
Carrie


CUTE! Totally love this!
ReplyDeleteI absolutely LOVE the way this turned out. You may just see me in your store today buying these boards :)
ReplyDeleteJessica
myworldmadebyhand.blogspot.com
Oh my goodness what a fun idea! I really want to try and make this for myself....Thanks for the great idea!
ReplyDeletesuch a great idea!
ReplyDeleteLOVE it! I want to make one now. :)
ReplyDeleteoh my I love it!
ReplyDeleteLove the sign,love the quote! Great job!
ReplyDeleteLove this!! Wish I lived near by so I could come to your store!
ReplyDeleteI don't remember hearing this quote before and it gave me chills when I saw this sign. Great message for us all to remember. The sign is cute and the decor around it is perfect. I love the yellow and blue together!
ReplyDeleteWhat a fabulous idea and so pretty! I've linked you up to my Wednesday link party!
ReplyDeleteI love this! I found it on pinterest and made my husband see it.
ReplyDeleteThe colours are gorgeous and the quote is inspiring!
x
Can you tell me what the font is called? Thanks for the FABULOUS idea!!! Also, I don't live near your store, can you give me an idea of the size of each individual board? THANKS!!!
ReplyDeleteThis is so great. Thanks for the tutorial!
ReplyDeleteGlad you found a clamp, holding them looks like it would be uncomfortable after a while :)
I love this!! Can you share/sell a copy of the layout?
ReplyDeleteThe font is called Rokkitt. We don't sell a copy of the layout but you can make your own using that font.
ReplyDeleteWhen you say that you sent that to the printer, what is the process for that? Do you send like a Word file or do you need a special program?
ReplyDeleteI am really excited to try this. My mom fell in love with it on pinterest and I am surprising it by making it for her.
Yes Carrie, we just printed the lettering in Word.
ReplyDeleteWhere can I find welcome boards? Thanks
ReplyDeleteWe sell them in our stores.
Delete